
Screened Porch Makeover For Less Than $500
This screened porch makeover for less than $500 transformed a boring space into a fabulous, favorite spot for relaxing and entertaining guests.


Several years ago, I decided we needed a screened porch makeover, but my budget was under $500 (and my hubs and I aren’t DIY savvy). Since necessity is the mother of invention, I researched Pinterest, visited home improvement stores, and finally devised a simple, budget friendly plan for transforming our small outdoor space. The results? Incredible!!!
For those of you who have a similar outdated, ugly space, here is an outline of what we did to improve ours.
The project basically consisted of 3 tasks: First, we overhauled the deck floor with a good cleaning and paint. Second, we put screening under the deck to keep bugs from coming in through the bottom. Finally, we put bulb lights around the top to add ambiance.
Noteworthy: When I say “we” did this and that, I use the term loosely, as Zane and I did none of the work:-) Our trusted go-to helper Roberto did all the work. That being said, those of you who are DIYers could likely do this entire project for almost half the price.
It has been a bit more than 3 years since we completed this project, and we are still thrilled with the results. The floor looks great~the paint has held up beautifully. The lights still work, and we haven’t even had to replace a bulb. The screening looked great for about 2 years, then it began to collect bugs and dirt. We took it down several months ago but do plan to get Roberto to put in a new one.
Here is a breakdown of what we did, along with most of the items and where to buy:
Flooring: We began the project by having Roberto pull up the existing indoor/outdoor carpet and prep the wood for painting. He pressure washed the wood with part water/part clorox. After it dried (over the weekend), Roberto spent several hours scraping away glue and debris that wasn’t removed during the pressure wash.
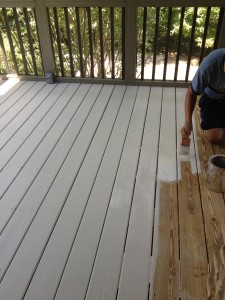
Next came priming the deck for painting. To start, Roberto applied one coat of Behr latex indoor-outdoor primer. A gallon was only about $22, and we bought two. The paint rep at Home Depot tinted the primer the same color as the deck paint I had chosen.
Roberto applied the primer (at left) with a paint brush so that he could get between the cracks of the wood. This was a time consuming task, but was well worth it for a finished look.

After the primer coat dried, Roberto applied two coats of Behr porch and patio paint in “washed khaki.” It is a lovely neutral that dried a tad lighter than the chip color. I chose this color because it blended well with my window trim. Roberto applied both coats of the deck paint with a roller.
Screening under the deck floor: To keep insects from coming in through the cracks of the floor, I had Roberto put screening underneath the deck. For years, we had used indoor outdoor carpet to keep bugs out, but I was done with carpet and wanted real wood. This screening was the best solution to keep bugs at bay.
 Roberto stapled the screening directly underneath the deck (at left) covering all of the beams. I actually like the way the screen makes the area look; it has a more finished effect than the bare, exposed wood.
 The screen that I bought (at right) specifically says it is good for insect screening. It cost $15.00 per roll, and we bought four rolls for our 250 square foot deck.
So far, the screen has worked; I have yet to see a bug inside my porch. This step is one that I would not skip if redoing a screened porch that has deck flooring. Especially in the South, bugs can ruin a party in no time, and any place where there is food, they will get in if no barrier is in place.
Lighting: To dress up the porch at night, I decided to put string lights along the ceiling, and I am thrilled with the look! After searching in home & garden, craft, and online stores, I came across exactly what I wanted at Target. It was not only my favorite look, it was the least expensive option that I found.

I chose the Room Essentials globe string lights at left. At less than $15.00 per box, each strand has 25 lights and is approximately 20 feet long. I ordered six boxes and ended up needing only four (but love having an extra box for replacement needs).
A friend of mine used these G-40 clear globe string lights on her outdoor space, and they look amazing. They have a bit more of an industrial look than my lights and are shaped a bit differently. Either look is great; it is just personal preference.

The photo at right shows the cord before we screwed in the bulbs. Roberto used u-shaped nails (I think they are especially for cable wires). He ran one extension cord to an electrical outlet, and we turn the lights on and off at this one plug. Since we only use these at night, this is not a problem at all.

Tip: So that Roberto could attach the light cord, I removed all bulbs from the string lights and put them on an unused air filter. This kept them all in one place and safe from breakage until time to attach them to the light string.
The screened porch makeover was a huge success. It was quick (3-4 days), inexpensive (approximately $200 for materials), and easy. Even though we spent a bit more for labor, it was worth every penny. Below are a few photos of the finished project.
I’ve gotten lots of feedback from this post over the years, and many readers have written after doing a similar makeover. I love hearing from readers, so please let me know if you have any questions or if you have anything to share. As always, thanks so much for stopping by. Be blessed, and stay savvy!!!


Aside from the natural light coming from the sun, it is best to add lighting accessories that provide diverse light intensities. Choose something that can be adjusted from gloomy to very bright depending on the needs.
Thank you for your valuable tips. Love this.
Hi there!!! The same pollen situation is here in Birmingham and no, the screens don’t keep it out. In the South, I doubt many screens can block pollen and give a nice view to the outside. That would probably be closing in and putting windows:-)
I have to take my pillows in during the two weeks that yellow is everywhere. As for the screening underneath, we finally removed that because it looked unattractive (we have a seating area underneath as well). But oddly, no bugs seem to come from underneath (but we do have a pest company to spray for mosquitos). I need to update this post, but I hope this helps!!!!
Hi Jamie,
Beautiful, thanks for posting! This is a project we have in our list for later this year. A few questions. We live in ATL. There is a TON of pollen in the spring. Does the screen keep allergens out? Below our porch is a concrete area where people can sit and relax. It can be accessed from the basement. So what we and guests would see if we were below is stapled screen above us right? Do you have ideas here?
Thanks!!
Hi Birdgett, yes it is on the inside, but there are strips of wood on the inside and outside, so it really is in the “middle” of the railing. Does that make sense?
Is the screen on the inside of railing?
Hi Michele! I have one ceiling fan offset (not over a table or any piece of furniture), and one “candle fixture” that holds candles over the copper table, and a floor lamp and a table lamp. I treat it like a small room…..Hope this helps!!!!
I’m curious what you did about overhead lighting vs. a ceiling fan? Any help would be appreciated.
Hi Courtney! No the floor is painted but all the rails and other wood is stained. I think the stain is a Briarwood grey….hope this helps!!!
Hi I was just wondering if you painted the floors the same color as you painted the rails going up to the ceiling on the inside. I can’t tell if it’s the same color or a couple shades darker
Great question, Judith! We replaced ours when tiny bugs got stuck and dirt collected; this does happen with all screens. A good rinsing with a sprayer hose will keep them clean for a while, but eventually, they will need to be replaced. Hope this helps!
What do you feel will be the long term on the underneath screening as time goes by and dirt collects. Will it eventually fall or begin to sag?
Hi Jesse! Our space is roughly 9’8″ x 19’……with a small square alcove that jutts off to the side………It does take some “savvy” to arrange furniture without being cramped, so I’d go as big as possible if you are in the building stage:-) Hope this helps!!
very nice! May I ask the approximate dimensions of your screened area? I’m thinking of building mine to be 8 x 12 feet, but now I’m wondering if that will feel a bit cramped. thanks!
Hi Mary! The floors look GREAT……even where the chairs are being pulled in and out…….I am happy to send pics if you want me to….but I highly recommend the paint treatment. It has held up beautifully!!!!!
This is just what I was looking for! How is your painted floor holding up to dining chairs being pulled in and out from the table? That is a concern for me. Love what you’ve done.
Hi Michael! I know your wife will love it! Thanks for your comments!
Hey, Jamie thank you for sharing the beautiful photos! I would love to get this done for my wife, but I was concerned on the how to’s, as I am not the best do it yourself kind of guy. but now that I have seen this masterpiece from start to finish I really feel quite a bit more confident about the overall process of a remodel for my balcony, and I cannot wait to get started (if I ever actually get to it)!